GROWING MICRO GREENS IN YOUR INDOOR GREEN GARDEN
~SETTING UP TO GROW~
Set up where you can
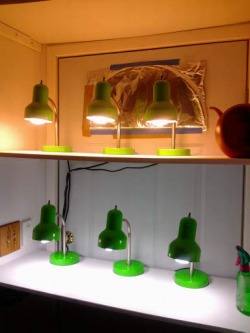
Growing micro greens in your very own indoor green garden can be utilized in any space. As you can see from this picture, I have set up a micro green growing station in front of an unused door. I have a small home and since I never use this door, it seemed like the perfect place to build a few easy shelves.
If you live in an apartment and can't hang shelves on the wall, you can use an old bookshelf or purchase any freestanding shelving system. Put them as high or low as you like.
I choose to use smaller individual lights so I could have a variety growing at all times. I purchased some small desk lamps and ordered some grow lights. I set up 6 placements. What I love about using individual lights are, if I don't need all 6 at one time, I can save money and only use what I need. You may want or need a bigger set up than I have. You can buy lights in 2ft lengths and above. It depends on the space you have and the amount of people in your family.
If you have a sunny windowsill and space to grow, your indoor green garden may not need any additional lighting. In my research, I've read information that states micro greens only need about 6 hours of sunlight. I can't verify that because I use lights. I turn my lights on when I get up in the morning and turn them off when I go to bed. No fuss, no muss and no timers.
Please think about a dedicated space to grow. If you set up a specific space for growing micro greens, you will most likely make the most of it and continue growing tray after tray after tray. If you clear off a space in front of the windowsill for 1 or 2 trays, after harvesting, that space may be needed for some other purpose or it may be in the way. Take the time to think about any nook or crannies in your home. With the addition of low to no heat grow lights, you can utilize any unused space for an indoor green garden and make it work for you.
The Cover Up
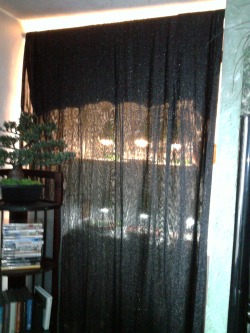
In my growing space, which is right in the front room, I didn't want the lights shining in my eyes, especially at night. Just imagine being all cuddled up in front of the fireplace sipping hot cocoa, warm candles glowing and flickering and BRIGHT LIGHTS shinning in your face. Yeah....doesn't work for me either!
I decided to hang some dark sparkly fabric in front of the opening and it works like a charm. When the lights are on, you can see through to my indoor green garden just enough to keep it interesting, while removing all glare. Anybody who comes into my home is always drawn to my set up. They begin to realize that perhaps they do have space in their home and visualizes the possibility of growing micro greens and setting up their own indoor green garden. Knowing you can hang a decorative curtain in front of your indoor green garden to keep the bright lights from blaring down on you, makes any area in your home possible.
TerraCotta Trays
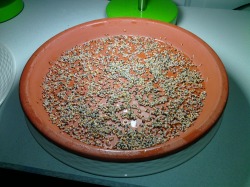
Arugula (24 hours)
I love terracotta trays because I love working without soil. As a matter of fact, when working with terracotta, you don't need any type of growing medium. Most micro greens grow from start to finish in a week's time. If I used soil, I would be dumping the soil in my compost bin every week and buying more soil again and again and again.
Growing micro greens in terracotta is easy. Soak your trays before adding any seeds. Arugula is a mucilaginous seed (gels up) and can be sprinkled on a soaked tray. Use a spray bottle and cover with a plate until the seeds sprout. DO NOT LET THE TRAY DRY OUT! Check the tray morning and night and spray. Do not be afraid to spray. Excess water will be absorbed in the tray and being a natural porous product, the terracotta supplies oxygen to the growing sprouts. When purchasing terracotta trays, make sure they are not glazed. When your sprouts start growing, water them, not just with a spray. Keep the trays damp. They can handle a lot more water than one would think as they evaporate their water supply. If the trays dry out, so do your seeds.
Terracotta takes a little getting used to. I realize growing micro greens in terracotta is not for everybody. The important part is, use whatever you are comfortable with. Just grow an indoor green garden and increase your health!
Plastic Trays
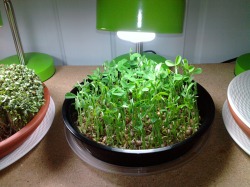
Peas (7 days) + (3 days sprouting)
Plastic trays work. Most people use plastic. They are convenient, they are easy and they are disposable. You can recycle your used take home salad trays, or you can purchase from the dealer. If reusing your salad trays (shown), poke drainage holes at the bottom and aeration holes in the top lid to give the 'green house' effect. The top lids can also be used with terracotta.
Micro greens can be grown on soil, paper towels or recyclable growing mediums. Some seeds need to be soaked before 'planting' and some like the arugula are mucilaginous and can be sprinkled onto the wet medium without soaking. Shown in the picture are pea greens, which I soaked and sprouted before planting. Legumes are another seed that need to show some sprouts tails before planting. By sprouting the harder seeds first, you practically guarantee a good healthy growth cycle. Please follow the instructions for sprouting when purchasing your seeds and you will be growing micro greens in no time.
*******************
